Coffee & Quinoa

  • Home
  • About
  • Recipes
  • Links
  • Contact
You are here: Home / Archives for Techniques

Simple Roasted Vegetable Stock

March 26, 2013 by Erica

Simple Roasted Vegetable Stock

A few months ago, I had a failed veggie stock experiment. It was my first attempt and I’m not sure what went wrong; I think I used too many greens and too few carrots and onions. And maybe too much water? Regardless, it was very disheartening, as I’ve never had a problem making meat-based stocks. It convinced me for a while that vegetable stock should be left to the pros, and I’ve been buying it from Whole Foods ever since.

Recently, though, I wanted to make a soup that just uses a simple broth for the base (recipe coming tomorrow!), and I felt like I couldn’t cop out and use store-bought stuff. If I’m going to use store-bought broth, I at least want it to be hidden, you know? So I gave the ol’ veggie stock another shot, and this time I roasted the vegetables to make sure they would be flavorful enough. Success! If veggie stock should be left to the pros, well, consider me one of them… and you can be, too.

Simple Roasted Vegetable Stock

Making your own stock really isn’t as scary as it sounds, and it’s also cheaper than buying it. And I should point out that it’s much quicker than making chicken stock. Unlike meat-based stocks, simmering vegetable stock for longer does not give it more flavor, so an hour is all you need. And as a bonus, you’ll feel like Martha Stewart as your kitchen fills with the scent of your homemade stock bubbling on the stove. For some reason, this always makes me feel like I really have my life together. Ego boost in a soup pot? Sure, I’ll take it!

Get crackin’ on this homemade vegetable stock so you can be prepared for the soup recipe coming tomorrow!

Simple Roasted Vegetable Stock

Simple Roasted Vegetable Stock
 
Print
Hands-on time
5 mins
Cook time
1 hour 45 mins
Total time
1 hour 50 mins
 
Author: Erica
Yields: 3-4 quarts
Ingredients
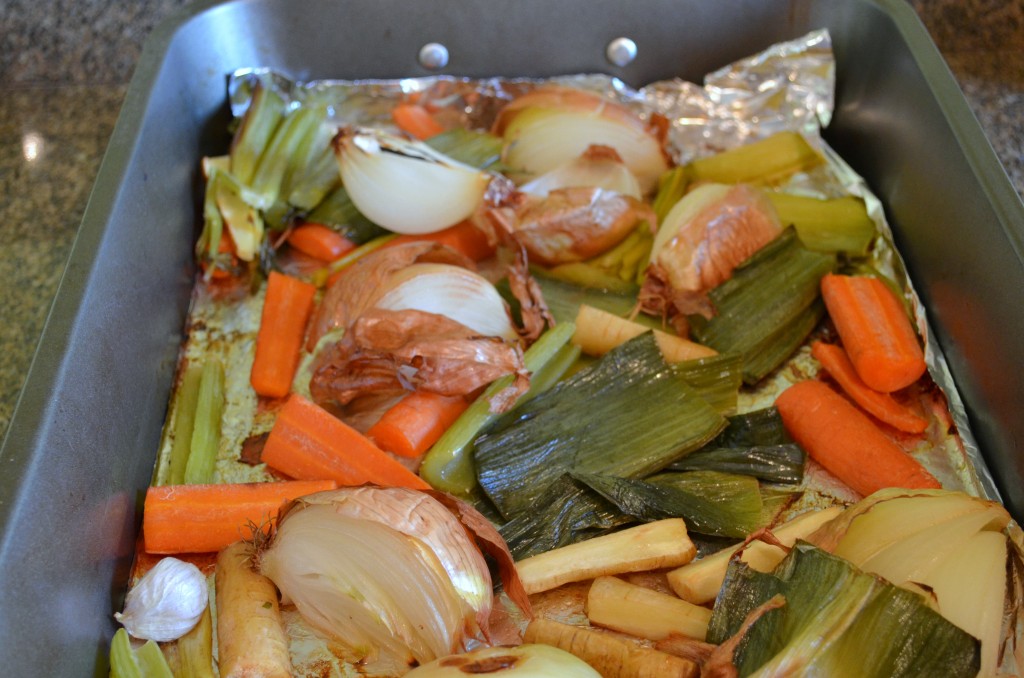
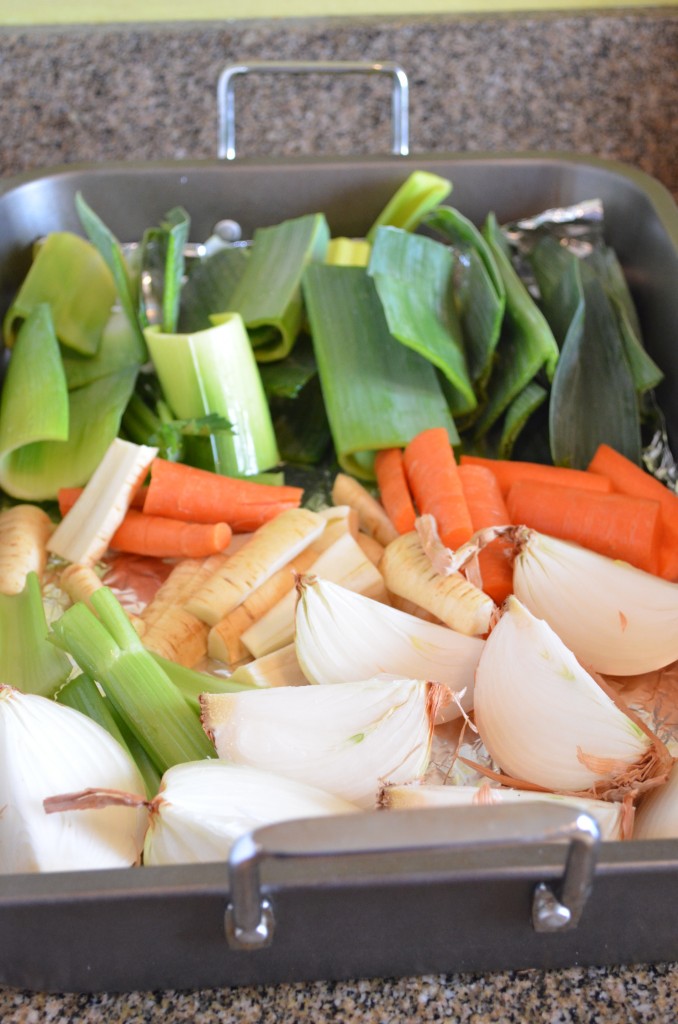
  • 2 carrots, rinsed and roughly chopped
  • 2 parsnips, rinsed and roughly chopped
  • 2 stalks celery, rinsed and roughly chopped
  • greens of 1 leek, thoroughly cleaned and roughly chopped
  • 2 yellow onions, skins left on, quartered
  • 3 garlic cloves, peels left on
  • 2 Tbsp olive oil (more or less)
  • 1 small bunch parsley
  • 4-5 sprigs of thyme
  • 1 tsp black peppercorns
  • 2 bay leaves
Instructions
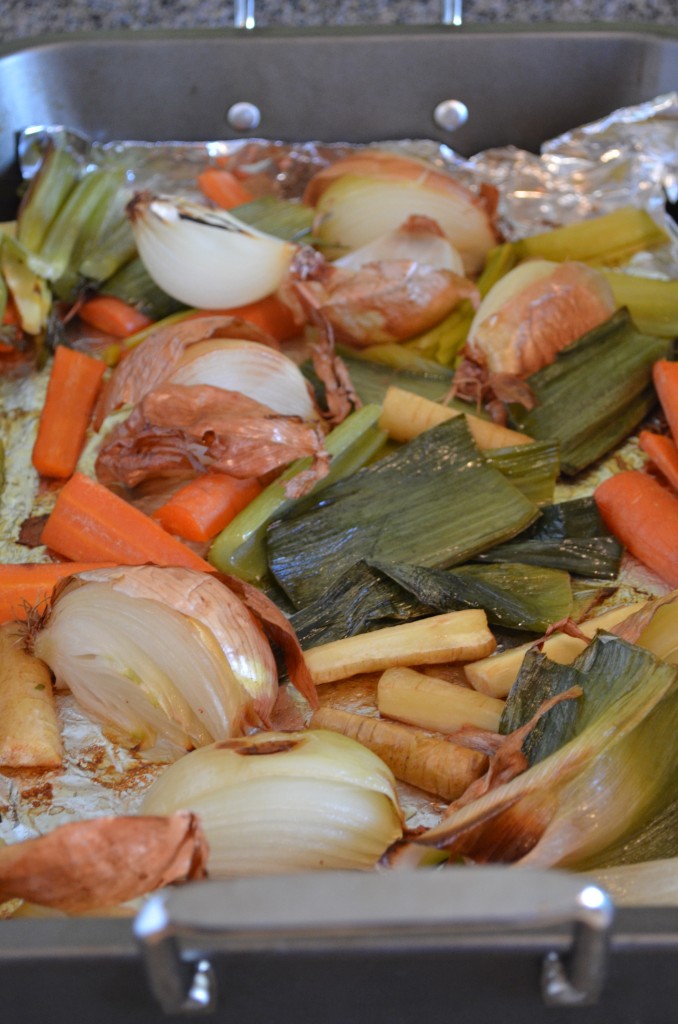
  1. Preheat oven to 400. Place vegetables (carrots through garlic) in a roasting pan. Drizzle with olive oil (I probably used about 2 Tbsp but you can use more or less) and toss to coat. Roast for 45 minutes, stirring about every 10-15 minutes to ensure that nothing burns. If you notice that any of the vegetables are starting to char before the time is up, remove them and continue cooking the rest. Some caramelization is fine, but not charring! The leek greens are especially prone to burn.
  2. Remove from oven and place the vegetables in a large pot with the parsley, thyme, peppercorns, and bay leaves. Cover with cold water. (The more water you use, the less concentrated the flavor of your stock will be.) Bring to a boil and simmer for an hour. (A few minutes more or less is fine.)
  3. Strain into storage containers. If not using in the next day or two, freeze until ready to use.
3.2.1753


Filed Under: Soups, Techniques, Vegan, Vegetarian Tagged With: broth, soup, stock

Extra Creamy Hummus

December 21, 2012 by Erica

Coffee & Quinoa | extra creamy hummus

And now for something not at all Christmas-themed. Because it’s yummy and I couldn’t resist sharing.

I’ve discovered the secret to creamy homemade hummus. Only 3.4 million people got there before me.

Coffee & Quinoa | extra creamy hummus

Have you made hummus before? It sounds easy to do – add all ingredients and process until smooth – and it was one of the things I was most excited to make when I bought a food processor a few months ago. Then I tried to make it myself and… ugh. It was just nothing like the creamy-textured stuff I love to buy. It was dense. I was bummed.

So I made my usual assumption for things that taste delicious when someone else makes them and terrible when I do: the stuff from the store/restaurant/wherever probably has oil/butter/other bad stuff by the POUND, and that’s what makes it taste so good. (This is usually a fair assumption… Sometimes I think that when something at a restaurant tastes good, I should refuse to eat any more. It’s probably too unhealthy! Life is just so unfair.) Well naturally I just continued buying hummus from the store. Sigh. The homemade stuff really was horrible.

But I didn’t want to give up on one of my favorite foods, and something other people seem to love making at home! It turns out, all it took to set me straight was Googling “creamy hummus,” which I did the other day. Should have done that before. 3.41 million results. I looked through about 3 of them and quickly learned the secret…

Coffee & Quinoa | extra creamy hummus

It’s the order, stupid. You can’t just “add all ingredients and process until smooth” (although I love nothing more than to discover a recipe with those instructions). But in the case of hummus, you have to emulsify the tahini with some liquid to lighten it up. Then you can add the rest of the ingredients, and it will stay light! Otherwise, the whole thing is heavy and weighed-down, just like plain tahini can be. And luckily this adds about 3 seconds to the time it takes to make this recipe, and no extra oil. Oh happy day!

You can change up the amounts of spices in this recipe, or roast the garlic for a milder flavor. Once you’ve added in the emulsifying step, it’s really hard to go wrong!

Serving with adorable mini peppers is highly recommended. So is eating while you take pictures.

Coffee & Quinoa | extra creamy hummus

Extra Creamy Hummus
 
Print
Hands-on time
5 mins
Total time
5 mins
 
Discover the secret to light and creamy homemade hummus. No chickpea-peeling required.
Author: Erica
Yields: about 4 cups
Ingredients
  • 1/2 cup tahini
  • juice of 2 lemons
  • 1/2 cup water
  • 2-3 cloves garlic, roughly chopped (I used 3 and it was quite garlicky, just the way I like it)
  • 3 cups cooked chickpeas (2 14-oz cans, rinsed and drained)
  • 1/3 cup olive oil
  • 1 1/2 tsp smoked paprika
  • 1 tsp cumin
  • salt and pepper to taste
Instructions
  1. Add tahini, lemon juice and water to a food processor (or blender if you're brave!). Process on high speed until it becomes very light-colored and fluffy, which shouldn't take long.
  2. Add the garlic and process again until incorporated. Add the chickpeas and olive oil, about 1/3 at a time, processing to incorporate them completely before adding more. Once all of the chickpeas and olive oil are added, process for a few minutes longer, stopping to scrape the sides down occasionally, until it becomes as creamy as you'd like. If it seems too thick, add a bit more water (or olive oil for a richer hummus).
  3. When it's reached your desired consistency, stop the food processor and sprinkle in the paprika, cumin, and a pinch of salt and pepper. Process to blend them in. Taste and add more salt and pepper if you'd like, processing after each addition.
  4. Serve with crunchy vegetables, pita bread or tortilla chips, or use as a spread on sandwiches!
Notes
Adapted from Fresh Tart.
3.2.1753


Filed Under: Dips & Spreads, Techniques, Vegan, Vegetarian Tagged With: hummus

White Chocolate Leaf Cake

December 17, 2012 by Erica

white chocolate leaves | coffee & quinoa

I once bought a cookbook just because a cake like this was on the cover.

I think I was waiting for the bus. Next thing I knew, I had spent $25 on a cookbook. Oops.

I’ve since lost that cookbook during one of my moves. I don’t even remember the title or the author. It didn’t really matter – the cookbook, including the cake recipe that went along with the picture, turned out to be nothing special. Those beautiful white chocolate leaves, on the other hand, were something special. So special that I think they belong on your Christmas dessert this year. If you’re in charge of the sweets, you can’t do much better than a gorgeous cake that is so simple to decorate.

white chocolate leaves | coffee & quinoa

These chocolate leaves look like they involve some serious work, but they actually take only 10 or 15 minutes. Below is a step-by-step tutorial.

This weekend I made these leaves to go on a hazelnut brown butter cake from Smitten Kitchen with this vegan chocolate ganache. I baked mini cakes in 1-cup ramekins (1/2 cup of batter in each), and used 2 layers for each little tower. I highly recommend the hazelnut brown butter/chocolate ganache combo, with some extra ganache and chopped hazelnuts in between layers! (One thing to note about the ganache, though: it starts to turn a darker brown pretty quickly, so you would do best to decorate the cake within 2 hours of eating. If that’s not possible, use a different ganache recipe.) If you’re a white chocolate lover, a cake covered in white chocolate ganache, topped with these, and dusted with powdered sugar would be to die for.

White Chocolate Leaves

Makes leaves to cover a 9″ round cake

You will need:

several stems of lemon leaves
small pastry brush
4-6 oz white chocolate

Instructions:

First, get some lemon leaves from your local florist.

white chocolate leaves | coffee & quinoa

It’s helpful to call ahead, because you’ll sometimes get blank stares when you ask for them! Many florists have customers that buy lemon leaves for working with chocolate, but many others will have no idea why you want them. In any case, they’re cheap – I paid $2.67 for 4 stems. I tend to favor the small leaves, especially if I’m not covering an entire cake with them. You can ask the florist to try to pick out some stems with small leaves for you.

Pluck off the leaves you want to use and lay them face down on a flat surface. To top a 9-inch cake, you will probably want 20-25 leaves.

Melt the white chocolate in a small dish in the microwave, 30 seconds at a time. Stir in between. May I suggest that you have another 4-6 oz of white chocolate chips ready as a back-up? White chocolate burns very easily… I probably burn it 50% of the time I use it! So stirring every 30 seconds is important.

white chocolate leaves | coffee & quinoa

white chocolate leaves | coffee & quinoa

Now your chocolate is melted. Using the pastry brush, carefully brush the chocolate onto the back of each leaf. This way, when you peel the leaves off, the front of your chocolate will be indented.

The chocolate is heavy and a little more difficult to work with than you would think. It’s OK (in fact preferable) to give every leaf a thick coat. Don’t worry if it looks lumpy – you’re not going to see that part anyway. Just try to make smooth edges, because those will be visible from the front. If your chocolate starts to cool down too much and becomes too difficult to paint, warming it up for 15 seconds should make things easier.

As you finish each leaf, place them in a bowl to harden. You could also use a plate or baking sheet, but I like to use a bowl so that the leaves curl up a bit. They look more natural and elegant this way than if they are all flattened out.

white chocolate leaves | coffee & quinoa

Once you’re finished, place the bowl in the fridge or freezer to harden. This should only take a few minutes, but you can also leave them in the fridge overnight.

When you’re ready to decorate your cake, remove the bowl from the fridge. Place one leaf at a time on your palm for a few seconds to warm it up. Then carefully peel the leaf away. It should come off very easily. If it sticks at all, warm the leaf up with your hand for a few more seconds.

white chocolate leaves | coffee & quinoa

Now decorate your cake, touching the leaves as little as possible, as the white chocolate melts easily. If you’re decorating a whole cake, you can place the leaves in concentric circles and scatter some hazelnut halves or raspberries in the center. If you’re topping smaller cakes, you can place just a few on each cake.

white chocolate leaves | coffee & quinoa

So pretty. Definitely a special occasion dessert!

Enjoy :)

Filed Under: Cakes, Techniques Tagged With: butter & eggs, chocolate, christmas

Gingerbread Spiced Popcorn

December 14, 2012 by Erica

gingerbread spiced popcorn

You’re going to think I’m a crazy person in about 2 seconds.

I’m about to tell you to put popcorn kernels in a paper bag and stick it in your microwave. Crazy, right? I know. I think so too.

In case you’re wondering, yes, this was a Pinterest find. Like so many things I enthusiastically pin, I didn’t try this out for months. But then the other night I wanted some popcorn, and I’m still kind of scared of making it in a pot with oil… it just doesn’t sound foolproof enough for this girl, who is prone to burning things to the bottom of her pots. Plus washing a large, oily and possibly scorched pot is like the last thing I want to do.

gingerbread spiced popcorn

So I tried this, expecting it to be a waste of popcorn kernels and the 100 brown paper bags that I had to buy because apparently they are not sold in smaller quantities. But then I started hearing the first magical popping sounds. Mr. Orville Redenbacher (or whoever first made microwave popcorn into a business) was a con man, because you can literally make it in a brown paper bag.

Basically, you do just that – pour 1/4 cup of popcorn kernels into a brown paper bag, fold the bag over, and microwave it. Even without any oil, it pops just like microwave popcorn does. And then, because it has no oil, obviously you can smother it in butter, brown sugar and spices and eat a whole bowl full of it.

This recipe makes less than your standard bag of microwave popcorn, because lunch bags don’t expand with those nice rounded sides the way microwave popcorn bags do. Let’s just say I tried a larger amount, and ended up with popcorn kernels flying loose around my microwave!

I added some gingerbread spices to this popcorn for a holiday twist. I will definitely be making some different versions of it in the future!

gingerbread spiced popcorn

Gingerbread Spiced Popcorn

Method from Squawkfox

Ingredients:

1/4 cup unpopped kernels
1 Tbsp butter or Earth Balance, melted
1/4 tsp salt
1 tsp brown sugar
1 tsp ground ginger
½ tsp cinnamon
¼ tsp allspice
pinch ground cloves

Instructions:

Pour popcorn kernels into a brown paper lunch bag. Fold the top over several times and place in microwave. Microwave on high for 3 minutes, but stay close by to listen to the popping. Remove from microwave as soon as popping slows to 1-2 seconds in between pops, which is usually between 2:30-2:40 for me. Leaving it in the whole 3 minutes will probably burn it, depending on your microwave.

While popcorn is popping, mix together the salt, sugar and spices in a small bowl. You may have to break up the brown sugar with the back of the spoon to incorporate it into the spices.

Pour popped popcorn into a large bowl. Drizzle melted butter over and toss with hands. Sprinkle spice mixture over the top, tossing several times to coat. You can use as little or as much of the spice mixture as you like – I like to use it all.

Enjoy!

Makes 6 cups popped

Time: 5-10 minutes

Filed Under: Snack, Techniques Tagged With: christmas, popcorn

Perfect Brown Rice

December 4, 2012 by Erica

perfect brown rice

This one of those annoying posts where I give you one part of a recipe, then wait until the next day to give you the exciting part. Kind of like pizza dough without the actual toppings.

But hold on, because this is kinda life-changing! Wait… is your life more exciting than mine? Or just less rice-based? If it’s less rice-based, then this will be life-changing.

Let me start by saying that I was always a basmati rice girl. I had seen a bunch of “never make mushy brown rice again!” Pinterest posts, but I thought, no big deal, I never have trouble with white rice. Then I started trying to eat whole grains, and WOAH – I just could not get my brown rice to cook right. Order it from my favorite Thai place and it’s deliciously chewy and tender, make it at home and it turns to mush and burns the bottom of my pot to boot. And I do NOT have room for a rice cooker in my tiny little kitchen. So I dug up those old pins, and I found: Make it like pasta.

Revolutionary.

That’s the secret, you guys! You use more water than you usually would for rice, then you strain it (and let the rice steam a bit more).

perfect brown rice

See? Life-changing.

It doesn’t really matter how much water you use here (just like pasta). Just make sure you use a pot that’s big enough to hold a bit more water than you’re used to.

Try this method and see if it doesn’t change your opinion of brown rice!

Coming tomorrow is my new favorite dinner, featuring: (you guessed it) Rice.

perfect brown rice

Perfect Brown Rice

Adapted from SkinnyTaste

Ingredients:

1 cup brown rice (I prefer short-grain)
3-4 cups cold water

Instructions:

Rinse rice in a strainer under cold tap water.

Add water and rice to a pot. Bring to a boil over high heat. Reduce heat and simmer for 30 minutes.

Strain, then return rice to pot and close lid. Let steam for 20 minutes.

Fluff with a fork and serve!

Related Posts Plugin for WordPress, Blogger...

Filed Under: Techniques, Vegan, Vegetarian Tagged With: rice

Welcome

Hi, I'm Erica! I'm a lover of all types of food, although I’m mostly vegetarian these days. I like salad, but I LOVE chocolate. This blog is a place where I try to balance the two.
Read More…

  • 
  • 
  • 
  • 
  • 

Subscribe via email

Get new posts delivered straight to your inbox!

Recipes by Category

No-Bake Chocolate Peanut Butter Quinoa Cookies
Yogurt Panna Cotta with Balsamic Blueberries
fudgy chocolate pumpkin cake from coffee and quinoa
Fudgy Brownies with Lemon Curd
three roses cupcakes | Coffee & Quinoa

Archives

my foodgawker gallery
my healthy aperture gallery
View my Tasty Kitchen Profile

Connect

Hi, I'm Erica! I'm a lover of all types of food, although I’m mostly vegetarian these days. I like salad, but I LOVE chocolate. This blog is a place where I try to balance the two.

My Ultimate Avocado Toast | coffeeandquinoa.com
Herbed Tomato Soup with Cornbread Croutons | coffeeandquinoa.com
Our Wedding - Part Two | coffeeandquinoa.com
Blueberry Kale Stem Smoothie | coffeeandquinoa.com
Shredded Kale and Brussels Sprout Salad | coffeeandquinoa.com
Our Wedding 9.20.14 | coffeeandquinoa.com
  • 
  • 
  • 
  • 
  • 

Copyright © 2025 · Coffee & Quinoa · Site Design by Heather Mackan · Built on GenesisWP