Coffee & Quinoa

  • Home
  • About
  • Recipes
  • Links
  • Contact
You are here: Home / Archives for Home

Pomegranate Ginger Bellinis

December 31, 2012 by Erica

pomegranate ginger bellinis | Coffee & Quinoa

Here is an adult beverage for you, just in time for New Year’s Eve.

It comes with a secret: I don’t really like hard alcohol.

Shocking? Sorry. There are exceptions. Margaritas, bloody marys, even the occasional mojito… I like those. But for the most part, I’m a beer and wine kinda girl. Which is convenient, since I live in Utah where the liquor stores close at 7 pm and the grocery stores only sell 3.2% beer. Nate and I have gotten QUITE used to weak beer.

pomegranate ginger bellinis | Coffee & Quinoa

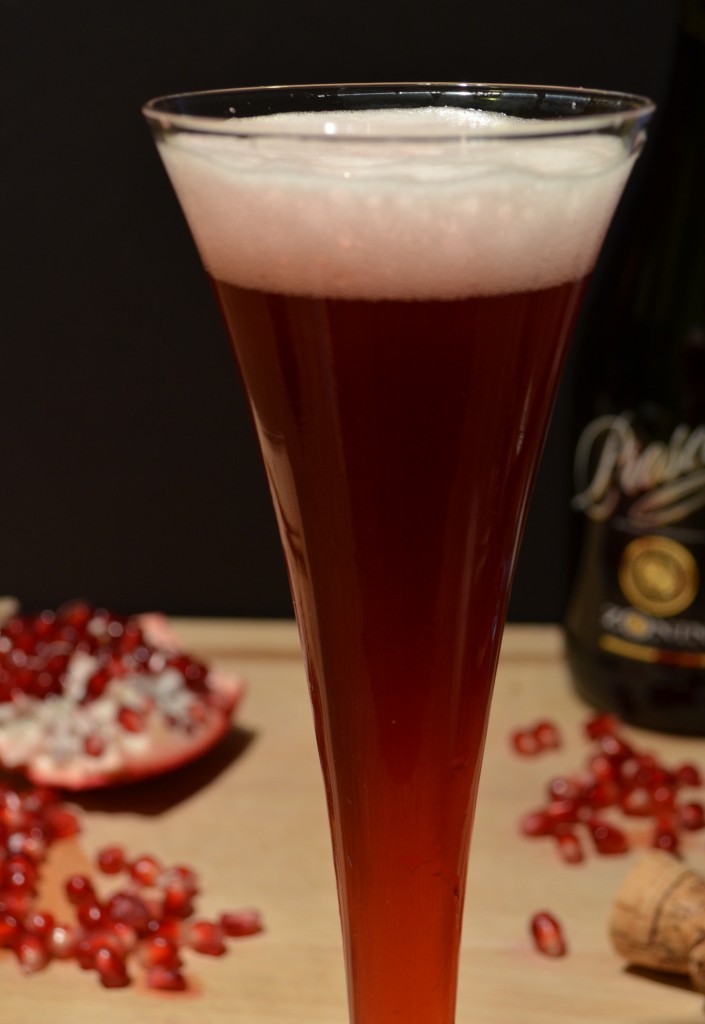
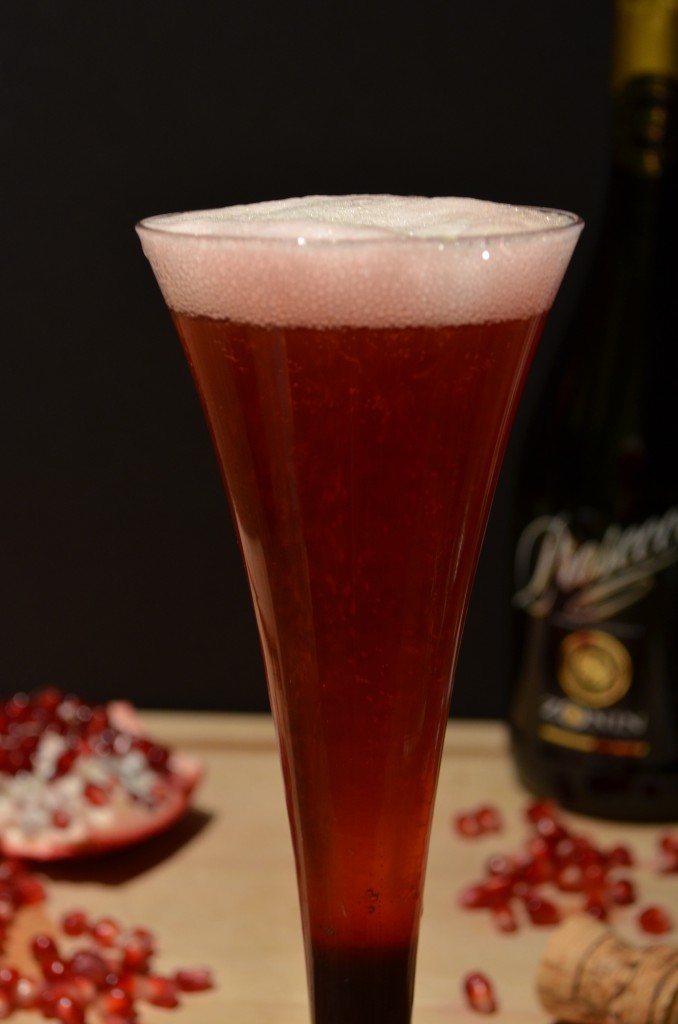
Anyway, that’s why I like bellinis, although I did have to plan ahead and buy some prosecco before 7 pm. (I don’t think these would be good with Utah beer.) They’re pretty much my ideal cocktail, since they look pretty, are easy to make (and don’t involve juicing 1,000,000 limes), and have nothing stronger than some Italian sparkling wine. Oh, did I mention that THEY ARE SO PRETTY? The colorful food kick continues and pomegranate is going to be my new favorite thing.

I also have to mention that, as the Italian cousin of the mimosa, these could totally be breakfast. So if you already have your drinks planned for tonight… get to the wine store before 7 pm and then make these for your New Year’s Day brunch.

Pomegranate Ginger Bellinis

Makes about 5 cocktails

Adapted from Epicurious

Ingredients:

1 cup pomegranate juice

1 heaping Tbsp peeled and chopped fresh ginger

1 Tbsp sugar

1 bottle prosecco (I used Zonin)

Instructions:

In a small saucepan, bring pomegranate juice, ginger, and sugar to a simmer over medium-high heat. Stir to dissolve sugar. Continue to simmer until liquid is reduced to 1/3 cup, about 10 minutes.

Remove from heat and strain into another container. Refrigerate (or put in the freezer if you’re in a hurry) until ready to serve. If you like, you can store the syrup in the fridge for several days.

When ready to serve, pour about a tablespoon of the pomegranate syrup into each glass and top with prosecco. If the syrup and prosecco do not readily mix, stir or carefully pour into a kitchen glass and then back into the serving glass to mix.

Time:

20 minutes

Filed Under: Cocktails Tagged With: champagne, cocktail, ginger, new year's, pomegranate, prosecco

Vegan Banana Bread

December 28, 2012 by Erica

vegan banana bread | Coffee & Quinoa

Good morning and happy Friday!

As I write this (Thursday evening), I’m making my way back across the country after a wonderful Christmas with my family in Boston. When I’m booking a trip, it’s often tough for me to tell whether I’ll wish I had a longer or shorter time at my destination, but this is definitely a time that I wish I had an extra couple days to spend with everyone after the craziness of the holiday. Of course, everyone else starts heading home tomorrow, so maybe it’s good that I was the first one to leave… before I get bored or anything, you know :)

But instead of lounging around eating Mom’s cooking in their (newly redecorated and beautiful!) house, I’ll be headed into work tomorrow to catch up on the last stuff that needs to be done before the end of the year. I’m guessing about 50% of my co-workers will be there, and it should be a pretty relaxed day, although I do have a bunch to get done. But after that, thank goodness, is a 4-day weekend to spend skiing, cooking, and catching up on the other stuff in my life that obviously didn’t get done while I was playing Bejeweled and eating Christmas cookies in Boston.

The main thing I’m looking forward to this weekend is playing with my new camera! My dad and I tested it out for a few hours last night and again this morning, learning how to set the shutter speed and aperture, adjust the white balance and ISO exposure, and all kinds of other crazy stuff I’ve never done before. Of course, it has an auto mode, but I’m determined to use it like a DSLR and not just a point-and-shoot. We learned some cool stuff and I feel much less overwhelmed taking it home (like I’m a new parent or something) and learning what it can do. I took a few pictures this morning on the iPhone for contrast, and I’ll upload the DSLR and iPhone versions for contrast so you can see the difference at some point. It is CRAZY and I’m so excited to be using this awesome new camera! I really have a lot to learn, but I can already see that it will be WAY worth it.

vegan banana bread | Coffee & Quinoa

Anyway, it shouldn’t come a surprise that I didn’t have time to try out any new recipes at my parents’ house this week. But I do want to share this banana bread recipe that I made before I left Salt Lake. (And because I made it last week, that means these are still iPhone photos!) If, like me, you have a relaxing 4-day weekend ahead of you, this would be the perfect thing to pop in the oven to make your kitchen smell wonderful. It’s vegan (unlike ALLLL the baked goods I ate this week) and relatively healthy (again… unlike the pounds and pounds of Christmas cookies I’ve consumed), so it’s the perfect snack for this weekend between holidays. The fact that this banana bread is vegan does mean that it’s a little denser than one you’d make with eggs. It doesn’t rise as high, but don’t let that deter you – it tastes amazing!

his & hers bananas

Those of you who saw this “his and hers” banana picture on Facebook a few weeks ago may be able to guess that we end up with a LOT of banana bread-worthy fruit in our house. Nate prefers rock-hard totally green fruit, and typically doesn’t eat any of the bananas on our counter once they’re blemished with a single speck of brown. I will eat bananas at almost any stage, but I haven’t quite gotten down the science of how many to buy for our various ripeness preferences. We often end up with many bananas that he won’t eat and I just can’t keep up with. So I’ve taken to freezing them in a big Ziploc, planning on making lots of banana bread. I’m still not keeping up, though… we probably have at least a dozen bananas in our freezer.

What I’m getting at is that there might be a LOT of banana bread in the Coffee & Quinoa future. I’m hoping to make a more seasonal one this weekend! Enjoy this vegan banana bread in the meantime, though, and if you have any favorite banana bread recipes for me to try out, please send them my way!

vegan banana bread | Coffee & Quinoa

Vegan Banana Bread
 
Print
Hands-on time
10 mins
Cook time
40 mins
Total time
50 mins
 
This vegan banana bread is lightly seasoned with cinnamon, nutmeg, and cloves and studded with raisins and walnuts.
Author: Erica
Yields: 1 loaf
Ingredients
  • 3-4 very ripe to overripe bananas
  • ½ cup brown sugar
  • ¼ cup melted vegan butter or melted coconut oil (I used coconut oil)
  • 2 Tbsp maple syrup
  • 2 cups spelt flour (whole wheat or white flour would also work)
  • 1 tsp baking soda
  • 1 tsp cinnamon
  • 1 tsp kosher salt
  • 1/2 tsp nutmeg
  • pinch of ground cloves
  • ½ cup chopped walnuts, lightly toasted
  • ½ cup raisins
Instructions
  1. Preheat oven to 350 degrees. Spray a loaf pan with cooking spray and set aside.
  2. Mash bananas (with a fork is fine) in a medium-sized bowl. Add sugar, coconut oil, and maple syrup and stir to combine.
  3. In a separate large bowl, sift together the flour, baking soda, and spices. Gently fold in the banana mixture, followed by the walnuts and raisins.
  4. Pour into the prepared loaf pan and bake until a toothpick inserted into the middle comes out with moist crumbs, about 40 minutes. Remove from oven and cool in the pan on a wire rack. After 15 minutes, run a knife around the edges and invert onto the rack to finish cooling.
  5. Once cool (or you can even do this once the bread is warm, not hot), wrap in tin foil and store in the fridge. This keeps the edges nice and moist. I prefer to eat the banana bread the following day, not right out of the oven, but that's personal preference. It will keep for several days in the fridge.
Notes
Adapted from Smitten Kitchen and White Jacket Required.
3.2.1753


Filed Under: Quick Breads, Vegan Tagged With: bananas, bread, vegan

Mango Green Curry with Forbidden Rice

December 26, 2012 by Erica

Coffee & Quinoa | mango green curry with forbidden rice

Hi! Happy day after Christmas! The day when the dust clears, and you are left to play with your new toys… and eat some vegetables.

Maybe you are still celebrating with your family, maybe you are back at work, or travelling, or cleaning up the chaos that is your house when everyone descends on it. I am meeting up with some college friends to catch up… crazy how you can go literally YEARS without seeing your oldest friends when you live across the country!

I am also playing with my new toy from Santa – a DSLR camera! The pictures are about to get much better around here, folks. Actually, they will probably get much worse first. Kind of like a construction project entering the demolition phase, sometimes things have to get worse before they can get better. I’m going to do a lot of playing around (enlisting my dad’s help!) and then hopefully emerge with some tasty-looking photos. We’ll see! Does anyone have any tips for food photography ebooks they’ve used? I am considering buying either the one from Pinch of Yum or Spicie Foodie. Thoughts?

In the meantime, this is a recipe I came up with last week back in Salt Lake. My mom had been telling me to try forbidden rice for at least a month, and I’d been intrigued by it in the bulk bins at Whole Foods for a while… but I’ve also been too busy baking cakes.

When I finally resurfaced from my post-veganistic butter binge, I made this curry because all the bright colors of the mangoes and fresh veggies looked so beautiful with the black rice. I had actually never made a green curry before! This one turned out great, though, and I will definitely be adding green curry to my arsenal of “disguised leftover vegetables” dishes.

Coffee & Quinoa | mango green curry with forbidden rice

In that vein, some notes on the recipe: I usually don’t really care for green bell peppers, but actually loved them in here. I suspect the sweetness of the red ones might be too much with the mangoes and sweet potato? The kale was really excellent with the curry flavor, so I wouldn’t suggest skipping that. I used white-people-brand curry sauce a.k.a. Thai kitchen (because they sell it in my grocery store), so if you also have only inauthentic curry sauce lying around, rest assured that this is white people food and it will still taste good with white people curry sauce in it.

Finally, black a.k.a. forbidden rice: Have you tried it yet? You should. It is nuttier, richer, and just more flavorful than any other rice I’ve ever had. The texture (at least of the Whole Foods bulk bin stuff I bought) was very smooth. You could of course use white or brown rice here, but this is a great excuse to buy black rice if you never have before. In terms of cooking time, it seemed closer to white rice than brown rice to me. I started to cook it according to my brown rice instructions, but ended up not letting it steam as long because it was already very thoroughly cooked. I suspect you could cook it the same way you’d cook white rice. In conclusion… Google it. I haven’t yet, and that is usually a mistake.

Enjoy! Eat this while you play with your new toys.

Coffee & Quinoa | mango green curry with forbidden rice

Mango Green Curry with Forbidden Rice

Serves 4-6

Ingredients:

1 ½ cups dry forbidden rice
3 Tbsp coconut oil
3 Tbsp green curry
2 cloves garlic, minced
1 yellow onion, chopped
1-inch piece ginger, peeled and minced
14-oz can light coconut milk
juice of 1 lime
½ Tbsp brown sugar
1 Tbsp low sodium tamari or soy sauce
2 Thai chili peppers, pierced (optional)
1 small to medium sweet potato, peeled and chopped into ½-inch pieces
2 mangoes, peeled and chopped
2 green bell peppers, chopped
8 oz tofu, cubed (optional)
1 bunch kale, rinsed, stems removed, and torn into bite-sized pieces
toasted cashews for topping
green onions for topping

Instructions:

Cook rice according to package instructions.

Melt coconut oil in a large pan or Dutch oven over medium heat. Once hot, add the green curry paste and mash into the oil with the back of your spoon or spatula. Add the garlic, onion, and ginger and stir to coat. Saute for a minute or two until very fragrant.

Whisk in the coconut milk and bring to a simmer. Stir in the lime juice, brown sugar, and soy sauce. Slurp some of the broth off the spoon. It’s in the recipe – you have to do it! Now add the Thai chilies and sweet potato, cover, and simmer until chunks of sweet potato are tender, about 15 minutes.

Add the mangoes and bell peppers. Cover again and simmer for about 5 minutes. Peppers should be a bit softened but still retain some crunch.

Now toss in the tofu and kale. Cook until kale is just wilted and still bright green, 1-2 minutes. Remove from heat.

Serve with forbidden rice and sprinkle with green onions and cashews. Dig in!

Time:

40 minutes

Filed Under: Main Dishes, Vegan, Vegetarian Tagged With: curry, mangoes, rice, thai

Extra Creamy Hummus

December 21, 2012 by Erica

Coffee & Quinoa | extra creamy hummus

And now for something not at all Christmas-themed. Because it’s yummy and I couldn’t resist sharing.

I’ve discovered the secret to creamy homemade hummus. Only 3.4 million people got there before me.

Coffee & Quinoa | extra creamy hummus

Have you made hummus before? It sounds easy to do – add all ingredients and process until smooth – and it was one of the things I was most excited to make when I bought a food processor a few months ago. Then I tried to make it myself and… ugh. It was just nothing like the creamy-textured stuff I love to buy. It was dense. I was bummed.

So I made my usual assumption for things that taste delicious when someone else makes them and terrible when I do: the stuff from the store/restaurant/wherever probably has oil/butter/other bad stuff by the POUND, and that’s what makes it taste so good. (This is usually a fair assumption… Sometimes I think that when something at a restaurant tastes good, I should refuse to eat any more. It’s probably too unhealthy! Life is just so unfair.) Well naturally I just continued buying hummus from the store. Sigh. The homemade stuff really was horrible.

But I didn’t want to give up on one of my favorite foods, and something other people seem to love making at home! It turns out, all it took to set me straight was Googling “creamy hummus,” which I did the other day. Should have done that before. 3.41 million results. I looked through about 3 of them and quickly learned the secret…

Coffee & Quinoa | extra creamy hummus

It’s the order, stupid. You can’t just “add all ingredients and process until smooth” (although I love nothing more than to discover a recipe with those instructions). But in the case of hummus, you have to emulsify the tahini with some liquid to lighten it up. Then you can add the rest of the ingredients, and it will stay light! Otherwise, the whole thing is heavy and weighed-down, just like plain tahini can be. And luckily this adds about 3 seconds to the time it takes to make this recipe, and no extra oil. Oh happy day!

You can change up the amounts of spices in this recipe, or roast the garlic for a milder flavor. Once you’ve added in the emulsifying step, it’s really hard to go wrong!

Serving with adorable mini peppers is highly recommended. So is eating while you take pictures.

Coffee & Quinoa | extra creamy hummus

Extra Creamy Hummus
 
Print
Hands-on time
5 mins
Total time
5 mins
 
Discover the secret to light and creamy homemade hummus. No chickpea-peeling required.
Author: Erica
Yields: about 4 cups
Ingredients
  • 1/2 cup tahini
  • juice of 2 lemons
  • 1/2 cup water
  • 2-3 cloves garlic, roughly chopped (I used 3 and it was quite garlicky, just the way I like it)
  • 3 cups cooked chickpeas (2 14-oz cans, rinsed and drained)
  • 1/3 cup olive oil
  • 1 1/2 tsp smoked paprika
  • 1 tsp cumin
  • salt and pepper to taste
Instructions
  1. Add tahini, lemon juice and water to a food processor (or blender if you're brave!). Process on high speed until it becomes very light-colored and fluffy, which shouldn't take long.
  2. Add the garlic and process again until incorporated. Add the chickpeas and olive oil, about 1/3 at a time, processing to incorporate them completely before adding more. Once all of the chickpeas and olive oil are added, process for a few minutes longer, stopping to scrape the sides down occasionally, until it becomes as creamy as you'd like. If it seems too thick, add a bit more water (or olive oil for a richer hummus).
  3. When it's reached your desired consistency, stop the food processor and sprinkle in the paprika, cumin, and a pinch of salt and pepper. Process to blend them in. Taste and add more salt and pepper if you'd like, processing after each addition.
  4. Serve with crunchy vegetables, pita bread or tortilla chips, or use as a spread on sandwiches!
Notes
Adapted from Fresh Tart.
3.2.1753


Filed Under: Dips & Spreads, Techniques, Vegan, Vegetarian Tagged With: hummus

Spiced Red Wine Poached Pears

December 20, 2012 by Erica

red wine poaches pears

OK, if chocolate and hazelnut isn’t your thing, (then I don’t understand you BUT) I’ve still got you covered for Christmas dessert. You can totally invite me over if you’re going to serve these. (You should have a little talk with your taste buds about the chocolate hazelnut thing, though.)

This is the perfect dessert to end a rich holiday meal, when you know there will be cookies and other sweets on the table, too. Spiced red wine poached pears are positively healthy compared with what you could be serving (ahem hazelnut cake), yet elegant and interesting enough to satisfy any dessert-lover. And for those who like rich desserts (this girl!), a healthy dollop of mascarpone cheese is recommended.

red wine poached pears

Can you tell from these pictures how beautiful these pears are? They are poached (fancy word for simmered!) in red wine, then further soaked in the poaching liquid, which is finally reduced down to a syrupy glaze to pour over the pears. The color is just gorgeous. You know I have a thing for colorful Christmastime foods! And served with the creamy mascarpone, they are just heaven.

This is definitely an adult-table-only dish. Sorry kids! You wouldn’t like it anyway… way too grown-up for you :)

(Am I the only one that liked the taste of wine as a kid? I specifically remember dipping my finger in my dad’s white wine when I couldn’t have been older than 6. My mom told me to stop because wine made kids “sick.” Hah!)

Plan a day or so ahead for these pears so you can give them time to soak overnight and take on the beautiful color and flavor of the spiced wine. That means leaving some extra room in the fridge for them during your Christmas food prep… and oh yeah, leaving some extra room at the table for me!

Spiced Red Wine Poached Pears

Adapted from The Boston Globe

Ingredients:

4 cups cold water
juice of 1 lemon
4-6 firm but ripe pears with stems intact (I used Bosc, but Bartlett will work, too)
1 bottle light red wine (mine cost $6.99 and was perfect for the job)
1/2 cup sugar
juice of 1 orange
1 2-inch strip orange rind
1 star anise
1 tsp vanilla extract
2 whole cloves
1 cinnamon stick
3/4 cup mascarpone for serving (or whipped cream, if you prefer)

Instructions:

Juice the lemon into a large bowl with the water. Carefully peel the pears, keeping the stems intact and taking care not to dent them. Cut a small slice from the base of each pear so that it can sit upright. Place each one into the lemon juice mixture as you finish peeling and cutting it. This will miraculously keep them from browning!

In a pot large enough to hold all the pears, combine all other ingredients besides the mascarpone (wine through cinnamon stick). Bring to a simmer over medium heat, stirring until the sugar dissolves.

Add the pears and simmer for 25 minutes, turning every 5 minutes or so to ensure even color. They should be tender when pierced with a skewer. (They may need 5 to 10 minutes longer if they were not ripe.)

Remove from heat and allow pears to cool completely in the poaching liquid.

Once completely cool, transfer the pears in their liquid to the fridge for at least several hours and as long as 3 days. (I recommend at least overnight to develop a deeper color.) You can keep the whole pot in the fridge, or transfer to a different container to save space. If your pot/container is deep enough, keep the pears standing upright. If not, that’s fine, just turn them over occasionally to let them soak evenly. The sides where they lie down will be a little flat and less colored, but no one will mind.

Before serving, strain about 1/3 of the poaching liquid into a saucepan. Bring it to a boil over high heat. Remove lid, reduce heat to medium and let the mixture bubble steadily until it reduces to a syrupy glaze, about 15-20 minutes.

To serve, place each pear on a dessert plate or in a shallow bowl and drizzle with the syrup. Add mascarpone on the side.

Enjoy!

Time:

4 hours to 3 days (includes refrigeration time)

Related Posts Plugin for WordPress, Blogger...

Filed Under: Dessert Tagged With: christmas, pears, wine

  • « Previous Page
  • 1
  • …
  • 49
  • 50
  • 51
  • 52
  • 53
  • …
  • 58
  • Next Page »

Welcome

Hi, I'm Erica! I'm a lover of all types of food, although I’m mostly vegetarian these days. I like salad, but I LOVE chocolate. This blog is a place where I try to balance the two.
Read More…

  • 
  • 
  • 
  • 
  • 

Subscribe via email

Get new posts delivered straight to your inbox!

Recipes by Category

Peanut Butter Cupcakes with Banana Buttercream Frosting
Coconut Rhubarb Cake
Chocolate Coconut Butter Cups
Quinoa Chocolate Bark, 3 Ways
Fudgy Brownies with Lemon Curd

Archives

my foodgawker gallery
my healthy aperture gallery
View my Tasty Kitchen Profile

Connect

Hi, I'm Erica! I'm a lover of all types of food, although I’m mostly vegetarian these days. I like salad, but I LOVE chocolate. This blog is a place where I try to balance the two.

My Ultimate Avocado Toast | coffeeandquinoa.com
Herbed Tomato Soup with Cornbread Croutons | coffeeandquinoa.com
Our Wedding - Part Two | coffeeandquinoa.com
Blueberry Kale Stem Smoothie | coffeeandquinoa.com
Shredded Kale and Brussels Sprout Salad | coffeeandquinoa.com
Our Wedding 9.20.14 | coffeeandquinoa.com
  • 
  • 
  • 
  • 
  • 

Copyright © 2025 · Coffee & Quinoa · Site Design by Heather Mackan · Built on GenesisWP