Coffee & Quinoa

  • Home
  • About
  • Recipes
  • Links
  • Contact
You are here: Home / Archives for butter & eggs

Fat Cherry and Almond Scones

January 30, 2013 by Erica

Fat Cherry Scones | coffeeandquinoa.com

You’ve been so good lately.

Eating your green stuff.

Subbing beans for meat in your favorite dinners.

Even making steaks out of vegetables.

So maybe… just this once… you could be a little bit bad?

Fat Cherry Scones | coffeeandquinoa.com

You won’t regret it, I promise.

Fat Cherry Scones | coffeeandquinoa.com

Fat Cherry Scones | coffeeandquinoa.com

Fat Cherry Scones | coffeeandquinoa.com

I’ve been wanting to post a scone recipe on this site for quite some time. I don’t think I’ve ever met a scone I didn’t like.

And homemade scones are way better than bakery scones – trust me if you’ve never made them. At a bakery, the scones have been sitting around for about 6 hours before you get there, and they always seem to have dried out.

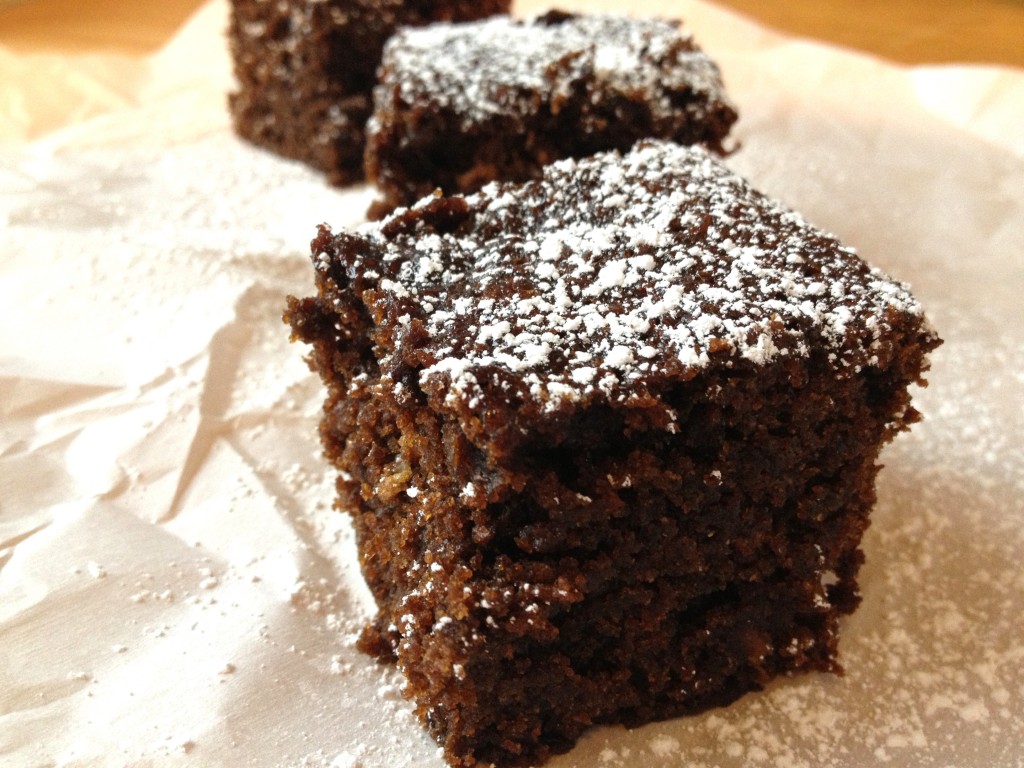
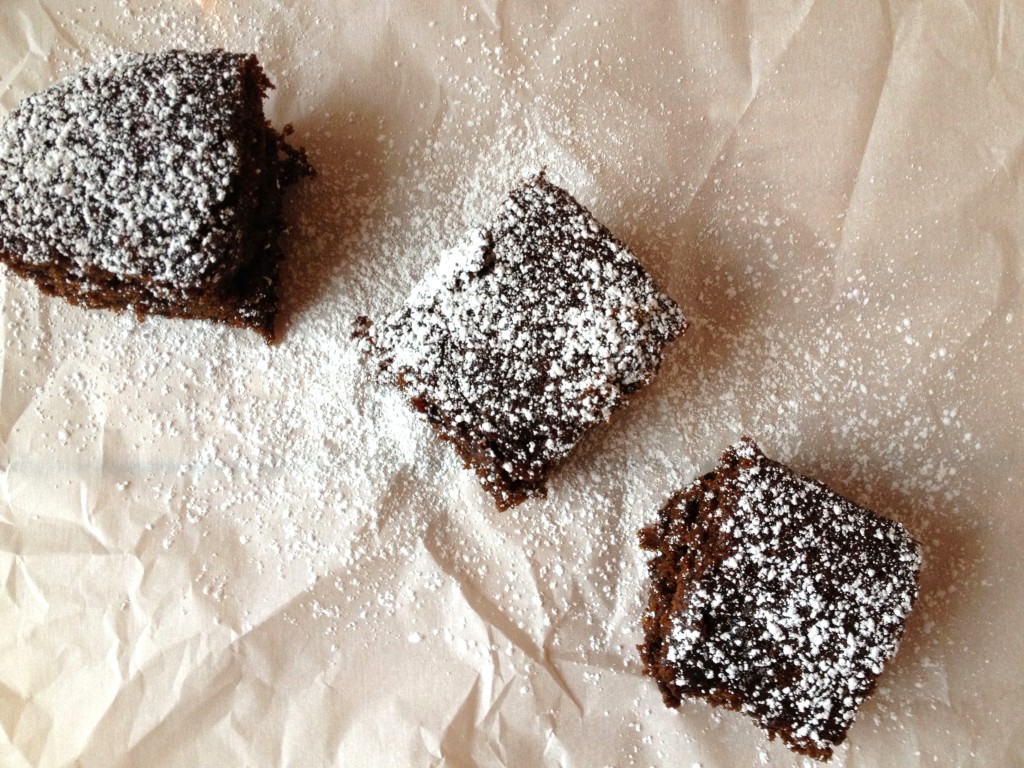
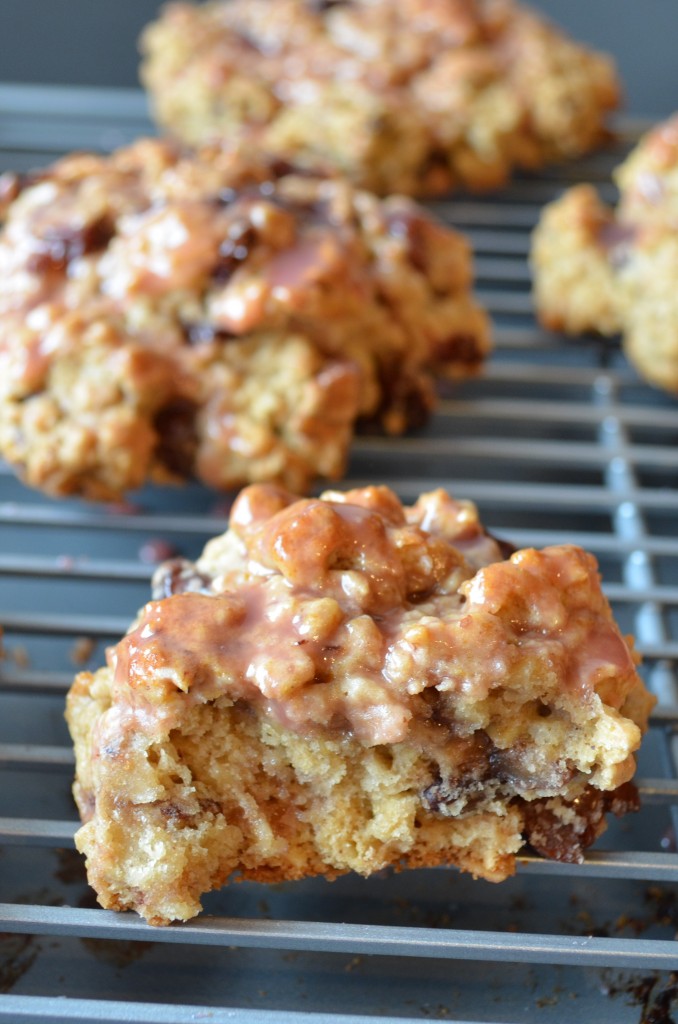
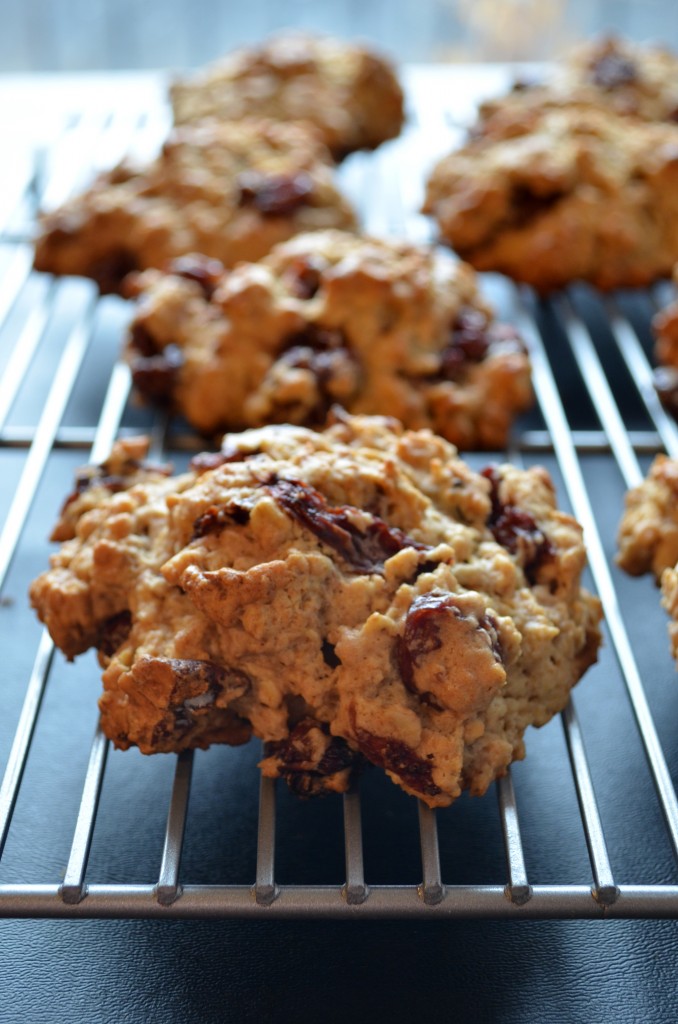
These, my friends, are not dry.

Fat Cherry Scones | coffeeandquinoa.com

In fact I got the name for these scones, “fat cherry,” from a kind of cookie my mom makes around Christmastime. Fat raisin cookies are apparently Bill Clinton’s favorite (or at least they were before he was vegan!), and the Boston Globe has shared the recipe for them a few times. They are basically an oatmeal raisin cookie with the raisins soaked in rum, which plumps them up and adds juicy flavor.

And why not do the same thing with tart dried cherries and stuff them in a scone?

Like I said: not dry. In any sense of the word.

Except I don’t much care for rum (or any other liqueur, for that matter), so I plumped up these cherries with tart cherry juice and almond extract. If you want boozy scones… slow down lady, it’s breakfast! Just kidding, I’m sure it’s 5 o’clock somewhere. You can soak your cherries in kirsch or amaretto if that sounds good to you.

What better treat to wake up to on Valentine’s Day morning – or any morning, for that matter – than these luscious cherry and almond scones?

Fat Cherry Scones | coffeeandquinoa.com

Fat Cherry and Almond Scones

Makes 8 scones

Ingredients:

For the scones:
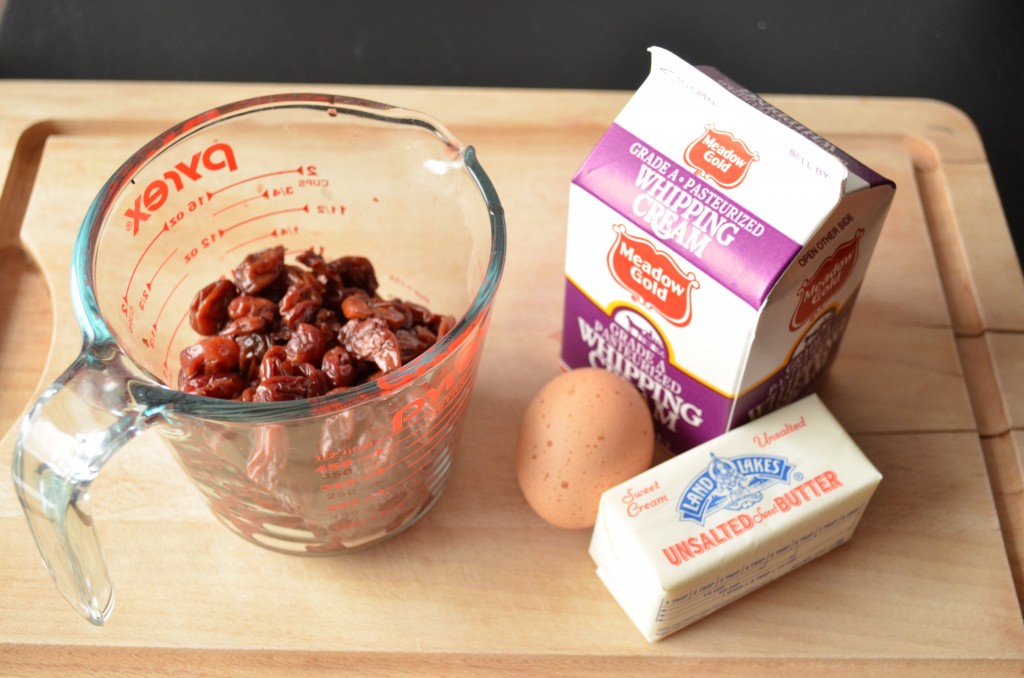
1 cup tart cherry juice
1 tsp almond extract
1 cup dried cherries
1 ½ cups all purpose flour
1 ¼ cups old-fashioned oats
1 ½ tsp baking powder
¼ tsp baking soda
¼ tsp kosher salt
½ cup raw almonds, lightly toasted and chopped
½ cup (1 stick) cold unsalted butter, cut into small pieces
¼ cup cold heavy cream
½ cup maple syrup
1 cold egg

For the glaze (optional):
1 cup confectioner’s sugar
3 Tbsp tart cherry juice

Instructions:

In a small saucepan, bring cherry juice and almond extract to a boil. Remove from heat, add cherries, and cover. Refrigerate at least an hour, and up to overnight, before proceeding.

Preheat oven to 350 and position a rack in the center of the oven.

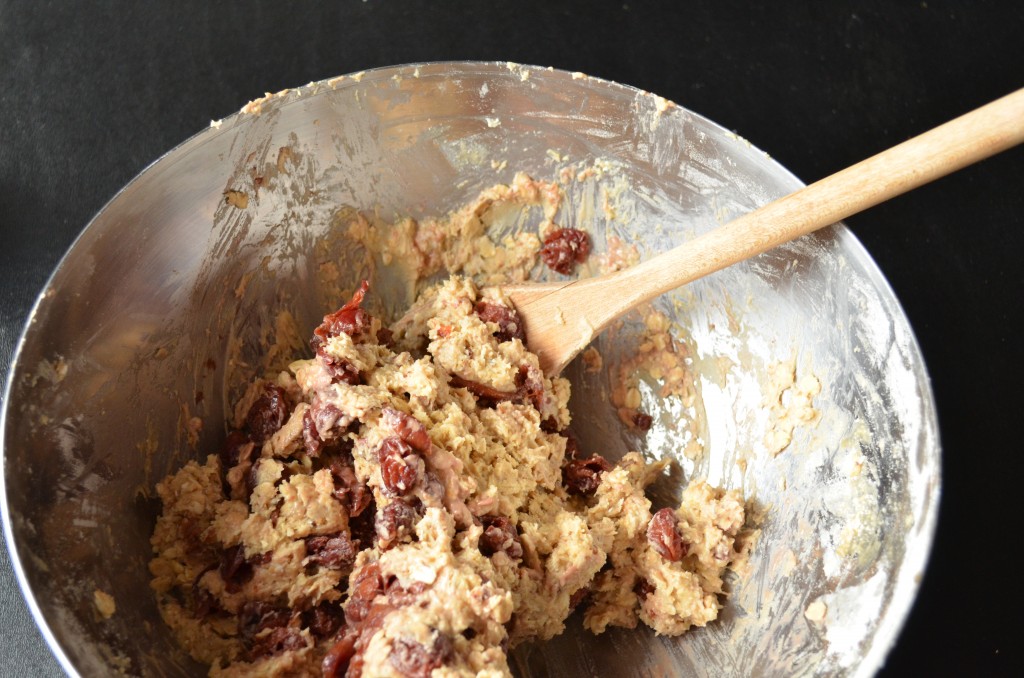
In a large bowl, stir together the flour, oats, baking powder, baking soda, and salt. Sprinkle the pieces of butter over the top. With your fingers or a pastry cutter, work the butter into the flour mixture until no large chunks remain.

In a small bowl, whisk together the cream, maple syrup, and egg. (I like to stick the bowl of dry ingredients and butter in the freezer while I do this, to make sure they don’t start to warm up.) Pour into the flour mixture and mix until just combined.

Drain the cherries and stir them into the batter along with the toasted almonds.

If you’ve come this far without licking batter off your fingers or the spoon… well, you have much more self control than I do.

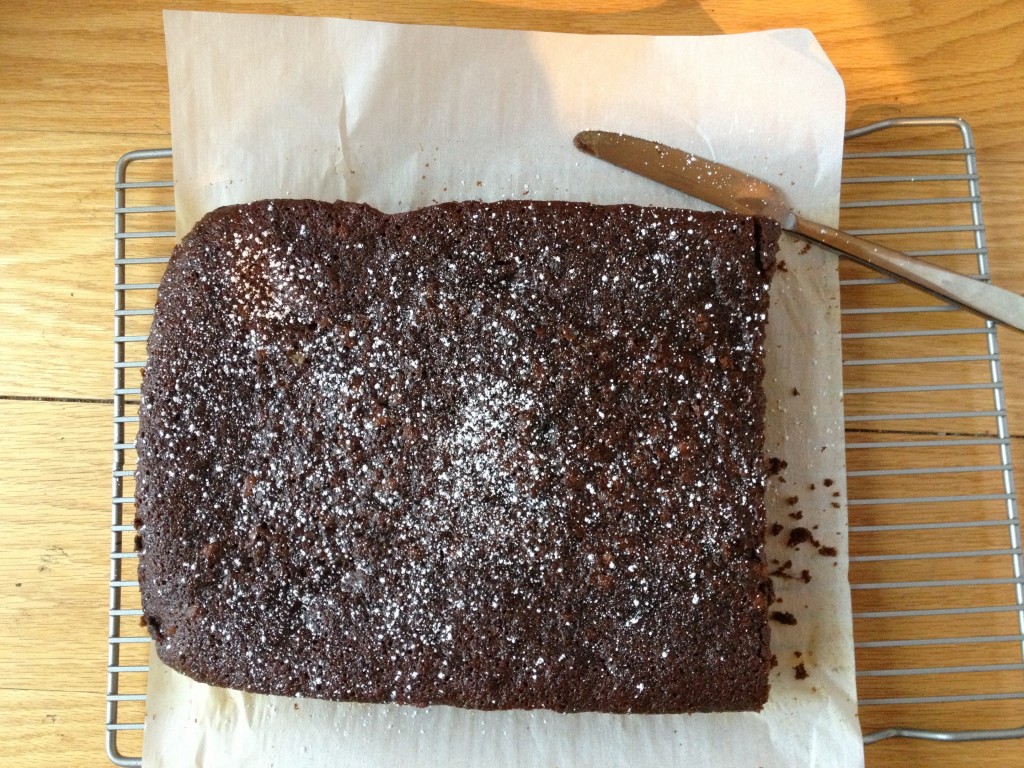
Drop mounded scoops of dough onto a baking sheet (unlined is fine) with at least an inch in between. (The scones won’t spread much, but better safe than sorry!) Bake at 350 for about 25 minutes, until golden brown. Gently transfer to a wire rack to cool completely.

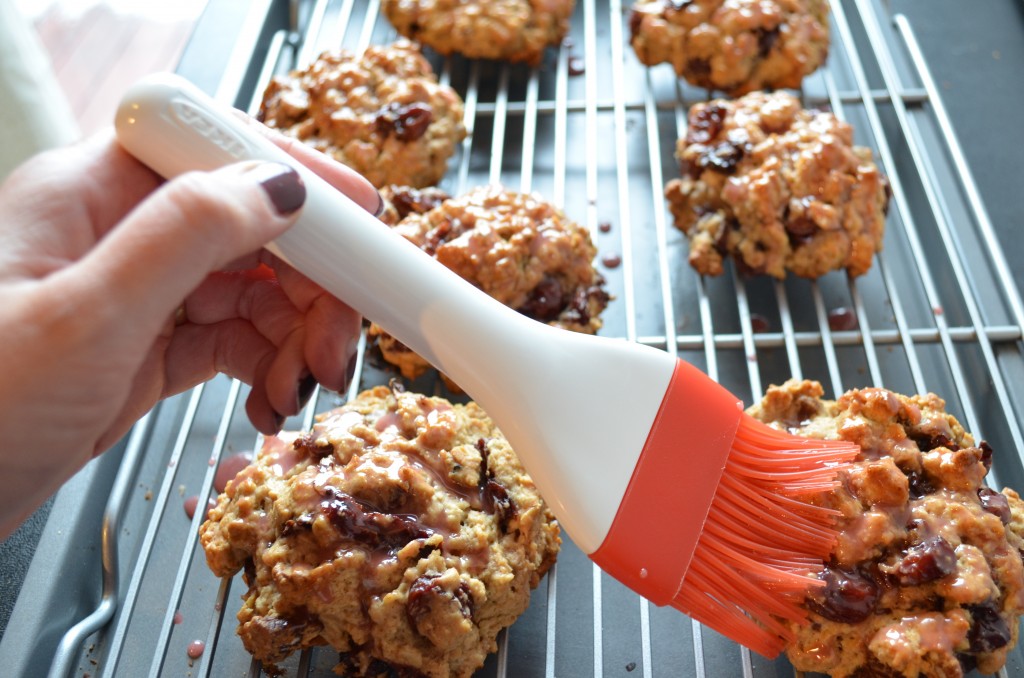
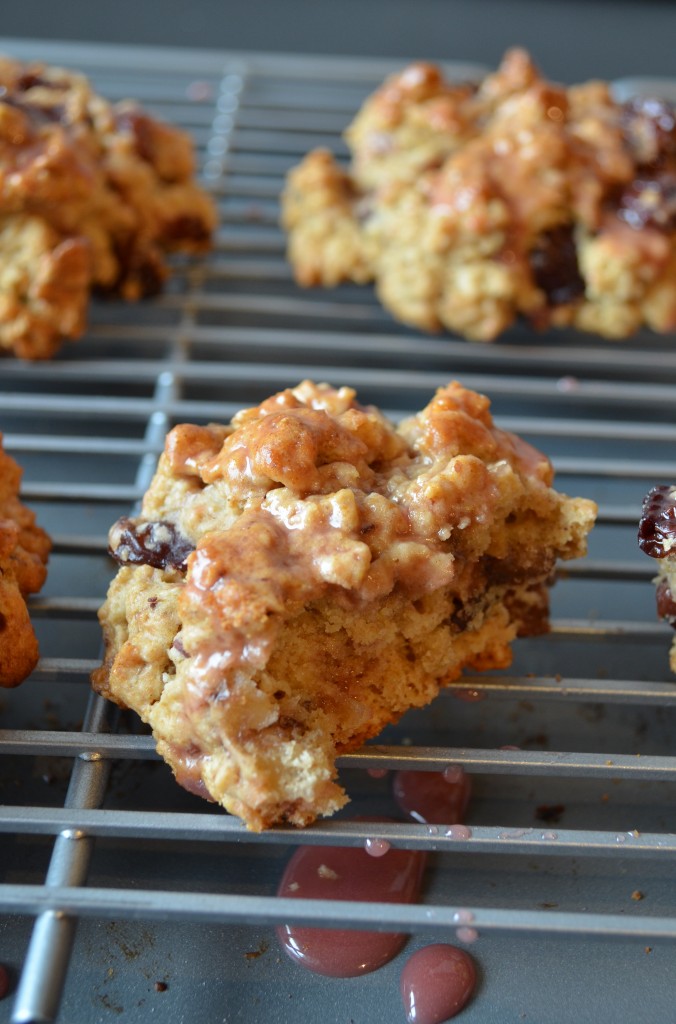
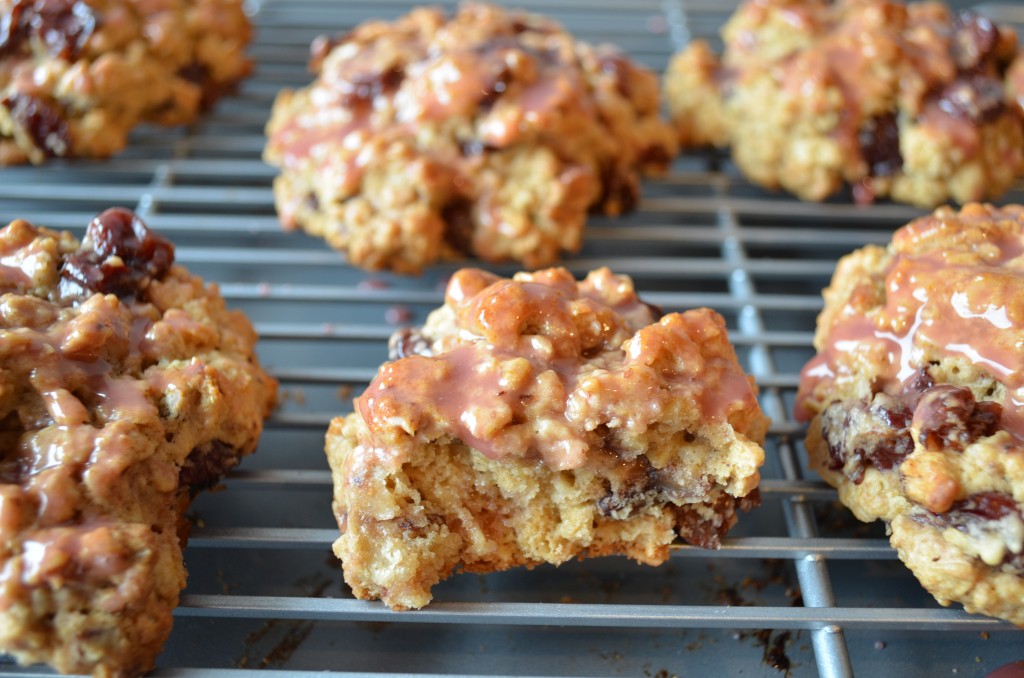
While the scones cool, make the tart cherry glaze. Whisk together the powdered sugar and cherry juice. Add more cherry juice as necessary to make a smooth glaze. Brush over the tops of the cooled scones. Don’t be afraid to glaze the scones 2, even 3 times, waiting a few minutes for the glaze to dry in between. The cherry glaze gives the scones this beautiful pink color, plus some extra cherry flavor!

The scones taste best on the day they are made, but can be kept in an airtight container for up to 3 days.

Time:

2 hours

Filed Under: Breakfast Tagged With: almond, butter & eggs, cherry, scones

Three Roses Cupcakes for The Bachelor

January 4, 2013 by Erica

three roses cupcakes | Coffee & Quinoa

Warning: A million cupcake photos ahead. It was too hard to narrow these down, so I didn’t even try. Try not to drool too much.

Now that I’ve gotten that out of the way, let me tell you why I made these cupcakes. Three little words: BACHELOR SEASON PREMIER.

Were you aware of the national holiday this coming Monday, when 20- and 30-something women everywhere celebrate the new season of ABC’s most addictive TV show by sitting on the couch for 2-3 hours drinking oaky chardonnay, judging people, and cringing as dozens of women humiliate themselves on national TV?

Oh… you’re not a Bachelor fan? I’m sorry. Much of my Tuesdays during Bachelor season are devoted to debriefing last night’s episode with friends, reading recaps, and laughing so hard I squeak as I read my favorite Bachelor blog. I will spare you the lengthy recaps and Bachelor bashing sessions on here… but it’s probably going to come up once or twice. You should probably watch so you can keep up with the times!

I may or may not participate in a fantasy league.

I’ll just let that sink in for a sec.

three roses cupcakes | Coffee & Quinoa

Anyway, each episode of The Bachelor culminates in a rose ceremony, where the bachelor hands out a rose to each girl he’d like to keep around for the next week.

And so, I introduce to you Three Roses Cupcakes. Rosemary chocolate cupcakes. Rose scented buttercream frosting. Gumdrop roses on top. That was as many roses as I could squeeze into one cupcake.

three roses cupcakes | Coffee & Quinoa

Several years ago back in Boston, I stayed home sick on this Monday and ended up making cupcakes with gumdrop roses for our Bachelor premier party.

I guess I wasn’t that sick.

And I decided to do it again this year! (Make cupcakes that is, not stay home… although I do have a gross cold. But I digress.) The other roses (rosemary and rose water) entered my head during my holiday trip to Boston. My family did a beer tasting at Night Shift Brewing before Christmas and tried their Rose brew, a “saison brewed with rosemary, rosehips, and honey, aged on crushed pink peppercorns.” The rosemary and rose combo was interesting and these cupcakes seemed like the perfect fit for it.

I’ll be honest, these cupcakes are a bit of a project, mostly because there are 3 components. I’m posting them today so that you can set aside a leisurely weekend afternoon to make them :) I’m going to give the cupcake and frosting recipes here, and then a longer photo tutorial for the roses.

If rosemary and/or rose water isn’t your thing, feel free to skip one or both of them, and you’ll end up with a delicious chocolate cupcake with vanilla buttercream frosting. You could obviously skip the gumdrop roses, too… but they’re so pretty! No one will believe you made them.

three roses cupcakes | Coffee & Quinoa

Three Roses Cupcakes

three roses cupcakes | Coffee & Quinoa

Rosemary Chocolate Cupcakes

Adapted from Flour by Joanne Chang

Yields 10-12 cupcakes (depending on how much batter you sample!)

Ingredients:

2 oz unsweetened chocolate, chopped

1/4 cup cocoa powder

1 cup sugar

1/2 cup (1 stick) unsalted butter

1/3 cup water

1/2 cup milk (I used almond milk)

1 egg

1 egg yolk

1/2 tsp vanilla extract

1 cup all-purpose flour

1 tsp baking powder

1/2 tsp baking soda

1/2 tsp kosher salt

1 Tbsp chopped finely fresh rosemary

Instructions:

Do not preheat oven yet – the batter must sit for an hour beforehand. Sorry!

In a large bowl, combine the chopped chocolate and cocoa powder.

In a heatproof dish, microwave the sugar, butter and water, stopping to stir every 30 seconds to 1 minute, until butter is melted and sugar is dissolved. Pour the hot butter-sugar mixture over the chocolate and whisk until chocolate is completely melted.

Next, whisk the egg, egg yolk, and vanilla into the chocolate mixture until thoroughly combined.

In a separate bowl, sift together the flour, baking powder, and baking soda. Add salt and rosemary and stir until well mixed. Dump the flour mixture on top of the chocolate mixture and whisk until thoroughly combined. The batter will be quite soupy.

Now the batter must sit for an hour at room temperature. This allows the liquid to absorb into the batter and thickens it up. Don’t skip this step! I once exploded these cupcakes in my oven after doing just such a thing. You can also keep the batter in your fridge for several days before baking.

After the batter has sat for an hour, you can now preheat the oven to 350. Position a rack in the center of the oven. Line a muffin tin with paper cucpake liners.

Spoon in the batter, filling each cup no more than 2/3 full.

Bake for about 25 minutes, until the tops spring back when pressed with your fingertip, and a toothpick inserted into the center of a cupcake comes out with moist crumbs. Let cool completely in the pan on a wire rack before frosting.

three roses cupcakes | Coffee & Quinoa

Rose Scented Buttercream

Ingredients:

1 cup (2 sticks) unsalted butter at room temperature (but not warmer)

2 tsp rose water (if leaving out, substitute with 1 tsp vanilla)

4 cups sifted confectioners’ sugar

2-4 Tbsp milk (I used almond milk)

Instructions:

With an electric stand or hand mixer, cream together butter and rose water on medium speed.

Sift in sugar 1 cup at a time, beating well and scraping down sides of bowl between each addition.

When all the sugar has been beaten in, the icing will appear dry. Add milk, 1 Tbsp at a time, and beat until light and fluffy.

Keep icing in the fridge, covered with a damp cloth or paper towel, until ready to assemble cupcakes.

Icing can be refrigerated in an airtight container for up to 2 weeks. Re-whip before using.

three roses cupcakes | Coffee & Quinoa

Gumdrop Roses

Adapted from Real Simple

Ingredients:

12 red gumdrops (or more – 3 gumdrops per rose)

3-4 green gumpdrops

granulated sugar for dusting work surface

rolling pin

three roses cupcakes | Coffee & Quinoa

Instructions:

Dust a clean work surface with granulated sugar. Place one gumdrop on the sugar and press with rolling pin.

Press and roll the gumdrop into a long tongue to about 1/8 inch thick. I like to flip the gumdrop over to re-coat it with sugar each time I roll it out to avoid sticking.

three roses cupcakes | Coffee & Quinoa

Repeat with remaining gumdrops.

Have you ever “sugared” your work surface before instead of “flouring” it? Isn’t it funny that you can do that?! It makes me giggle. The sugar really does a great job of keeping these from sticking, though. Add more sugar if they do start to stick, and wipe the sticky bits off your rolling pin. That being said, don’t worry too much if the edges turn out rough. Imperfect roses are some of the best ones!

Now cut each tongue in half crosswise.

three roses cupcakes | Coffee & Quinoa

Now we’re ready to make the roses! Roll one piece up like so:

three roses cupcakes | Coffee & Quinoa

Then wrap the other 5 halves around it, one by one:

three roses cupcakes | Coffee & Quinoa

Pinch the bottom of the rose together between each petal to hold it in place.

Repeat until you have 4 roses.

You will end up with a kind of ugly tail on each rose as you pinch the petals into place. No worries! Cut it off when you’re done so that the rose will be able to stand upright. Then handle as LITTLE as possible until you place them on the cupcakes.

three roses cupcakes | Coffee & Quinoa

For the leaves, roll out the green gumdrops in a similar way. You will first want to clean any red sticky bits off your rolling pin and work surface first. Then cut little leaf shapes out of the green tongues.

three roses cupcakes | Coffee & Quinoa

I like to cut 1-3 leaves for each rose; varying the number of leaves looks nice.

You don’t need to do anything with the leaves until you’re ready to assemble the cupcakes.

And that’s it! A couple things to note about these roses:

– I don’t recommend eating them, unless you like gumdrops. I don’t think they taste very good.

– I’ve tried making them with Swedish fish, because those taste better! But I found that the Swedish fish took a lot more elbow grease to roll out, and didn’t stick together as well. I don’t really recommend Swedish fish. But if you know that you are serving these to people who will insist on eating them and then be grossed out by the gumdrop flavor, you could definitely give Swedish fish a try.

– With rolling out the gumdrops, thinner is not necessarily better (unless you’re trying to do Swedish fish, where I’d advise that you roll them out pretty thin to get them sticky enough). The picture below illustrates the difference between a rose where the gumdrop petals are rolled out very thinly (left, and as pictured in the “tongue” pictures above) or not so thinly (right). Whichever you prefer!

three roses cupcakes | Coffee & Quinoa

Now the moment you’ve been waiting for… you’re all done with the many components of these cupcakes! To assemble:

Remove the completely cooled cupcakes (still in their paper liners) from the muffin tin.

three roses cupcakes | Coffee & Quinoa

Pipe icing (or spread with a knife) onto the cupcakes.

three roses cupcakes | Coffee & Quinoa

You will most likely have some icing leftover. You can freeze it! Just thaw and re-whip before using.

Place the roses on the cupcakes, sticking a few leaves into the icing next to each one. I think it looks nice to have roses on only a few of the cupcakes, but of course you could make more roses if you’re ambitious enough.

Voila! Impress your friends with these beautiful and fragrant cupcakes.

Time:

About 3 hours total

three roses cupcakes | Coffee & Quinoa

Enjoy and have a good weekend, friends! Let’s make sure to discuss The Bachelor on Tuesday.

Filed Under: Cupcakes Tagged With: butter & eggs, buttercream, cake decorating, cupcakes, frosting, rose water, rosemary, the bachelor

White Chocolate Leaf Cake

December 17, 2012 by Erica

white chocolate leaves | coffee & quinoa

I once bought a cookbook just because a cake like this was on the cover.

I think I was waiting for the bus. Next thing I knew, I had spent $25 on a cookbook. Oops.

I’ve since lost that cookbook during one of my moves. I don’t even remember the title or the author. It didn’t really matter – the cookbook, including the cake recipe that went along with the picture, turned out to be nothing special. Those beautiful white chocolate leaves, on the other hand, were something special. So special that I think they belong on your Christmas dessert this year. If you’re in charge of the sweets, you can’t do much better than a gorgeous cake that is so simple to decorate.

white chocolate leaves | coffee & quinoa

These chocolate leaves look like they involve some serious work, but they actually take only 10 or 15 minutes. Below is a step-by-step tutorial.

This weekend I made these leaves to go on a hazelnut brown butter cake from Smitten Kitchen with this vegan chocolate ganache. I baked mini cakes in 1-cup ramekins (1/2 cup of batter in each), and used 2 layers for each little tower. I highly recommend the hazelnut brown butter/chocolate ganache combo, with some extra ganache and chopped hazelnuts in between layers! (One thing to note about the ganache, though: it starts to turn a darker brown pretty quickly, so you would do best to decorate the cake within 2 hours of eating. If that’s not possible, use a different ganache recipe.) If you’re a white chocolate lover, a cake covered in white chocolate ganache, topped with these, and dusted with powdered sugar would be to die for.

White Chocolate Leaves

Makes leaves to cover a 9″ round cake

You will need:

several stems of lemon leaves
small pastry brush
4-6 oz white chocolate

Instructions:

First, get some lemon leaves from your local florist.

white chocolate leaves | coffee & quinoa

It’s helpful to call ahead, because you’ll sometimes get blank stares when you ask for them! Many florists have customers that buy lemon leaves for working with chocolate, but many others will have no idea why you want them. In any case, they’re cheap – I paid $2.67 for 4 stems. I tend to favor the small leaves, especially if I’m not covering an entire cake with them. You can ask the florist to try to pick out some stems with small leaves for you.

Pluck off the leaves you want to use and lay them face down on a flat surface. To top a 9-inch cake, you will probably want 20-25 leaves.

Melt the white chocolate in a small dish in the microwave, 30 seconds at a time. Stir in between. May I suggest that you have another 4-6 oz of white chocolate chips ready as a back-up? White chocolate burns very easily… I probably burn it 50% of the time I use it! So stirring every 30 seconds is important.

white chocolate leaves | coffee & quinoa

white chocolate leaves | coffee & quinoa

Now your chocolate is melted. Using the pastry brush, carefully brush the chocolate onto the back of each leaf. This way, when you peel the leaves off, the front of your chocolate will be indented.

The chocolate is heavy and a little more difficult to work with than you would think. It’s OK (in fact preferable) to give every leaf a thick coat. Don’t worry if it looks lumpy – you’re not going to see that part anyway. Just try to make smooth edges, because those will be visible from the front. If your chocolate starts to cool down too much and becomes too difficult to paint, warming it up for 15 seconds should make things easier.

As you finish each leaf, place them in a bowl to harden. You could also use a plate or baking sheet, but I like to use a bowl so that the leaves curl up a bit. They look more natural and elegant this way than if they are all flattened out.

white chocolate leaves | coffee & quinoa

Once you’re finished, place the bowl in the fridge or freezer to harden. This should only take a few minutes, but you can also leave them in the fridge overnight.

When you’re ready to decorate your cake, remove the bowl from the fridge. Place one leaf at a time on your palm for a few seconds to warm it up. Then carefully peel the leaf away. It should come off very easily. If it sticks at all, warm the leaf up with your hand for a few more seconds.

white chocolate leaves | coffee & quinoa

Now decorate your cake, touching the leaves as little as possible, as the white chocolate melts easily. If you’re decorating a whole cake, you can place the leaves in concentric circles and scatter some hazelnut halves or raspberries in the center. If you’re topping smaller cakes, you can place just a few on each cake.

white chocolate leaves | coffee & quinoa

So pretty. Definitely a special occasion dessert!

Enjoy :)

Filed Under: Cakes, Techniques Tagged With: butter & eggs, chocolate, christmas

Black Sticky Gingerbread

December 12, 2012 by Erica

black sticky gingerbread

Happy 12/12/12! I was tempted to publish this post at 12:12, but I resisted. I will smile inwardly every time I type the date today, though!

Now I hate to disappoint you… but this is not a thumbprint cookie recipe. I have never had a thumbprint cookie. What is it with those this year? Do they dominate the internet every holiday season, or is it just a recent Pinterest trend – this month’s version of pull-apart breads? Someone please fill me in on the thumbprint phenomenon.

OK, now that I’ve gotten that off my chest, it’s gingerbread time.

black sticky gingerbread

I think most people (including myself before this weekend) have only ever had gingerbread in cookie form. And dare I say this is better than gingerbread cookies?

Chewy, gooey, and moist desserts tend to be my favorite. That’s why gingerbread cookies to me are… meh. While this actual gingerbread, on the other hand, is amazing. It is dense, sticky, and the edges get perfectly caramelized in the oven. Mmmmm.

I made this this weekend (during my holiday multi-tasking!), then proceeded to force it on everyone who walked through the door for the next few days. “Hi, how are you, eat some gingerbread!” This recipe really makes quite a bit! Perfect if you have lots of holiday house guests. Not perfect when you’re home alone in your sweatpants staring at a huge tray of your new favorite dessert. I had to get the rest of it out the door! I was only partially successful… my hands are sticking to the keyboard as I type this.

Have you noticed a pattern to my recipe posts? “I made this this weekend. It was really good. I ate way too much of it.” Rinse, repeat. Sounds about right.

black sticky gingerbread

This recipe comes straight from 101 Cookbooks. Take a look back at the original post – I echo everything Heidi says!

Black Sticky Gingerbread

From 101 Cookbooks

Makes 20 hearty squares

Ingredients:

1 cup (2 sticks) unsalted butter
1/2 cup water
3/4 cup unsulphured blackstrap molasses
3/4 cup honey
1 cup packed dark brown sugar
3 cups whole wheat pastry flour (or all-purpose flour)
1 1/2 tsp baking soda
1/2 tsp salt
2 tsp ground ginger
2 tsp  ground cinnamon
1/2 tsp allspice
1/4 tsp ground cloves
3 large eggs, at room temperature
1/2 cup milk (I used almond milk)
1 Tbsp fresh ginger, grated or finely minced

Instructions:

Preheat oven to 325. Spray a 13×9 baking dish (I used glass) and line with parchment paper so that a few edges of paper hang over the sides.

In a medium saucepan over low heat, combine the butter, water, molasses, honey, and sugar. Heat until the butter is just melted, stirring occasionally. Remove from heat, pour into a large bowl, and set aside to cool.

In the meantime, combine the flour, baking soda, salt, and spices in a medium bowl. Set aside.

Once the molasses mixture feels just warm to the touch, add the eggs one at a time. Stir will to incorporate after each addition. Stir in the milk, then the dry ingredients. (Heidi says not to be too concerned if you can’t get every lump out. I found that my batter was somewhat lumpy, but Heidi was right – that was no big deal.) Stir in the minced ginger.

Pour into your prepared pan. The batter will be very thin. Don’t worry if some of it escapes the edges of the parchment paper. As long as the parchment paper is covering 2 sides of your pan, you should be able to remove the cake later with no problems.  Bake for 45-60 minutes, until the center of the cake springs back when pressed. (Like Heidi, this took me about 55 minutes.)

Remove from oven and cool for 10 minutes on a baking rack. At this point, use the parchment paper to remove the cake from the pan, and let it cool completely by itself on the rack.

Store in the refrigerator. Texture will be denser when cold and more cake-like when brought up to room temperature.

Filed Under: Quick Breads Tagged With: baking, butter & eggs, christmas

Healthy Balance

December 10, 2012 by Erica

There are a couple things I’ve made lately that haven’t appeared on the blog.

White wine cake.

white wine cake from coffee & quinoa

Rosemary and cheddar scones.

rosemary & cheddar scones from coffee & quiona

Vegan brownies.

vegan brownies from coffee & quinoa

Why haven’t I posted them, you ask?

Because they tasted terrible.

Over the past several months, a few vegan baked goods have come out well enough for me to be proud of. But the three above – in their non-vegan version – happen to be some of my favorite treats in the entire world. And try as I might, I just can’t make them taste good without butter or eggs.

Baking has been one of my favorite things since childhood, long before I ever enjoyed savory cooking. I love the certainty that following a recipe will produce a delicious end result… the smiles and exclamations from friends/family/co-workers when they eat something amazing I’ve baked… not to mention the fact that I love the taste of baked goods. So you can imagine my dismay when recipes don’t turn out and my friends/family/co-workers and I are unimpressed by something I’ve spent so much time on.

Can you guess where this is going?

It’s going in the direction of butter and eggs.

No more vegan baking, guys. A step back from this vegan thing in general.

This is really no big deal. I still plan on eating mostly plants, and when something can be made vegan or healthier without compromising flavor, that’s what I’ll do. But I’ll also start posting non-vegan and even non-vegetarian recipes and baked goods with eggs, butter, etc. I like making that kind of thing, so I want to share it with you as I go back a little toward the meat-eating side. We’ll see how it goes.

Is this just a holiday cop-out so I can eat my mom’s turkey meatballs and mint meringues when I go home for Christmas? Maybe.

I love that the “whole foods, plant-based diet” advocated in The China Study has given me a new framework for considering what’s healthy and what’s not. Those turkey meatballs are probably more of a splurge than pre-vegan me would have thought. And I love all the healthy new dishes I’ve been trying (and sharing here) because of my 6 months of veganism. Plant-based cooking is way more delicious than I ever could have thought, and I’ve fallen in love with many new veg-based meals. This is not the end of that story!

But let’s move more towards “healthy balance.” A lot of plant-based dinners and healthy snacks, and also some of the awesome desserts that I love sooooo much.

Phew, I’m glad to get that off my chest! Now I can start sharing my Christmas dishes tomorrow (some vegan, some not) guilt-free!

Related Posts Plugin for WordPress, Blogger...

Filed Under: Misc. Tagged With: baking, butter & eggs

  • « Previous Page
  • 1
  • 2
  • 3
  • 4

Welcome

Hi, I'm Erica! I'm a lover of all types of food, although I’m mostly vegetarian these days. I like salad, but I LOVE chocolate. This blog is a place where I try to balance the two.
Read More…

  • 
  • 
  • 
  • 
  • 

Subscribe via email

Get new posts delivered straight to your inbox!

Recipes by Category

Vanilla Cardamom Quinoa Pudding
No-Bake Chocolate Peanut Butter Quinoa Cookies
Raw Lemon Bar Bites
Chocolate Coconut Butter Cups
Salted Chocolate Ice Cream

Archives

my foodgawker gallery
my healthy aperture gallery
View my Tasty Kitchen Profile

Connect

Hi, I'm Erica! I'm a lover of all types of food, although I’m mostly vegetarian these days. I like salad, but I LOVE chocolate. This blog is a place where I try to balance the two.

My Ultimate Avocado Toast | coffeeandquinoa.com
Herbed Tomato Soup with Cornbread Croutons | coffeeandquinoa.com
Our Wedding - Part Two | coffeeandquinoa.com
Blueberry Kale Stem Smoothie | coffeeandquinoa.com
Shredded Kale and Brussels Sprout Salad | coffeeandquinoa.com
Our Wedding 9.20.14 | coffeeandquinoa.com
  • 
  • 
  • 
  • 
  • 

Copyright © 2025 · Coffee & Quinoa · Site Design by Heather Mackan · Built on GenesisWP